![]()
![]()
![]()
Use LEFT and RIGHT arrow keys to navigate between flashcards;
Use UP and DOWN arrow keys to flip the card;
H to show hint;
A reads text to speech;
23 Cards in this Set
- Front
- Back

|
In order to create a candlestick chart, you must have a data set that contains open, high, low and close values for each time period you want to display. The hollow or filled portion of the candlestick is called "the body" (also referred to as "the real body"). The long thin lines above and below the body represent the high/low range and are called "shadows" (also referred to as "wicks" and "tails"). The high is marked by the top of the upper shadow and the low by the bottom of the lower shadow. If the stock closes higher than its opening price, a hollow candlestick is drawn with the bottom of the body representing the opening price and the top of the body representing the closing price. If the stock closes lower than its opening price, a filled candlestick is drawn with the top of the body representing the opening price and the bottom of the body representing the closing price.
Hollow candlesticks, where the close is greater than the open, indicate buying pressure. Filled candlesticks, where the close is less than the open, indicate selling pressure. |
|
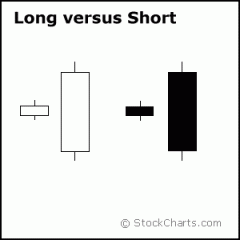
Generally speaking, the longer the body is, the more intense the buying or selling pressure. Conversely, short candlesticks indicate little price movement and represent consolidation.
|
Long white candlesticks show strong buying pressure. The longer the white candlestick is, the further the close is above the open. This indicates that prices advanced significantly from open to close and buyers were aggressive. While long white candlesticks are generally bullish, much depends on their position within the broader technical picture. After extended declines, long white candlesticks can mark a potential turning point or support level. If buying gets too aggressive after a long advance, it can lead to excessive bullishness.
Long black candlesticks show strong selling pressure. The longer the black candlestick is, the further the close is below the open. This indicates that prices declined significantly from the open and sellers were aggressive. After a long advance, a long black candlestick can foreshadow a turning point or mark a future resistance level. After a long decline a long black candlestick can indicate panic or capitulation. |
|

|
In Japanese “Marubozu” means almost bald. Even more potent long candlesticks are the Marubozu brothers, Black and White. Marubozu do not have upper or lower shadows and the high and low are represented by the open or close. A White Marubozu forms when the open equals the low and the close equals the high. This indicates that buyers controlled the price action from the first trade to the last trade. Black Marubozu form when the open equals the high and the close equals the low. This indicates that sellers controlled the price action from the first trade to the last trade.
|
|
|
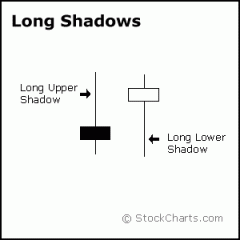
The upper and lower shadows on candlesticks can provide valuable information about the trading session. Upper shadows represent the session high and lower shadows the session low. Candlesticks with short shadows indicate that most of the trading action was confined near the open and close. Candlesticks with long shadows show that prices extended well past the open and close.
Candlesticks with a long upper shadow and short lower shadow indicate that buyers dominated during the session, and bid prices higher. However, sellers later forced prices down from their highs, and the weak close created a long upper shadow. Conversely, candlesticks with long lower shadows and short upper shadows indicate that sellers dominated during the session and drove prices lower. However, buyers later resurfaced to bid prices higher by the end of the session and the strong close created a long lower shadow. |
|
|
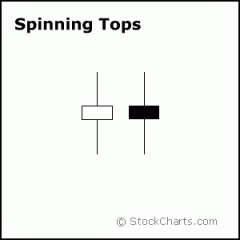
Candlesticks with a long upper shadow, long lower shadow and small real body are called spinning tops. One long shadow represents a reversal of sorts; spinning tops represent indecision. The small real body (whether hollow or filled) shows little movement from open to close, and the shadows indicate that both bulls and bears were active during the session. Even though the session opened and closed with little change, prices moved significantly higher and lower in the meantime. Neither buyers nor sellers could gain the upper hand and the result was a standoff. After a long advance or long white candlestick, a spinning top indicates weakness among the bulls and a potential change or interruption in trend. After a long decline or long black candlestick, a spinning top indicates weakness among the bears and a potential change or interruption in trend.
|
|

|
Doji are important candlesticks that provide information on their own and as components of in a number of important patterns. Doji form when a security's open and close are virtually equal. The length of the upper and lower shadows can vary and the resulting candlestick looks like a cross, inverted cross or plus sign. Alone, doji are neutral patterns. Any bullish or bearish bias is based on preceding price action and future confirmation. The word "Doji" refers to both the singular and plural form.
Ideally, but not necessarily, the open and close should be equal. While a doji with an equal open and close would be considered more robust, it is more important to capture the essence of the candlestick. Doji convey a sense of indecision or tug-of-war between buyers and sellers. Prices move above and below the opening level during the session, but close at or near the opening level. The result is a standoff. Neither bulls nor bears were able to gain control and a turning point could be de |
|

|
Different securities have different criteria for determining the robustness of a doji. A $20 stock could form a doji with a 1/8 point difference between open and close, while a $200 stock might form one with a 1 1/4 point difference. Determining the robustness of the doji will depend on the price, recent volatility, and previous candlesticks. Relative to previous candlesticks, the doji should have a very small body that appears as a thin line. Steven Nison notes that a doji that forms among other candlesticks with small real bodies would not be considered important. However, a doji that forms among candlesticks with long real bodies would be deemed significant.
|
|

|
The relevance of a doji depends on the preceding trend or preceding candlesticks. After an advance, or long white candlestick, a doji signals that the buying pressure is starting to weaken. After a decline, or long black candlestick, a doji signals that selling pressure is starting to diminish. Doji indicate that the forces of supply and demand are becoming more evenly matched and a change in trend may be near. Doji alone are not enough to mark a reversal and further confirmation may be warranted.
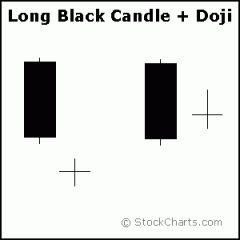
After an advance or long white candlestick, a doji signals that buying pressure may be diminishing and the uptrend could be nearing an end. Whereas a security can decline simply from a lack of buyers, continued buying pressure is required to sustain an uptrend. Therefore, a doji may be more significant after an uptrend or long white candlestick. |
|
|
Even after the doji forms, further downside is required for bearish confirmation. This may come as a gap down, long black candlestick, or decline below the long white candlestick's open. After a long white candlestick and doji, traders should be on the alert for a potential evening doji star.
After a decline or long black candlestick, a doji indicates that selling pressure may be diminishing and the downtrend could be nearing an end. Even though the bears are starting to lose control of the decline, further strength is required to confirm any reversal. Bullish confirmation could come from a gap up, long white candlestick or advance above the long black candlestick's open. After a long black candlestick and doji, traders should be on the alert for a potential morning doji star. |
|

|
Long-legged doji have long upper and lower shadows that are almost equal in length. These doji reflect a great amount of indecision in the market. Long-legged doji indicate that prices traded well above and below the session's opening level, but closed virtually even with the open. After a whole lot of yelling and screaming, the end result showed little change from the initial open.
|
|
|
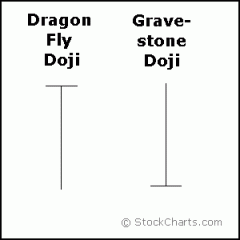
Dragon Fly Doji
Dragon fly doji form when the open, high and close are equal and the low creates a long lower shadow. The resulting candlestick looks like a "T" with a long lower shadow and no upper shadow. Dragon fly doji indicate that sellers dominated trading and drove prices lower during the session. By the end of the session, buyers resurfaced and pushed prices back to the opening level and the session high. The reversal implications of a dragon fly doji depend on previous price action and future confirmation. The long lower shadow provides evidence of buying pressure, but the low indicates that plenty of sellers still loom. After a long downtrend, long black candlestick, or at support, a dragon fly doji could signal a potential bullish reversal or bottom. After a long uptrend, long white candlestick or at resistance, the long lower shadow could foreshadow a potential bearish reversal or top. Bearish or bullish confirmation is required for both situations. |
|

|
Gravestone doji form when the open, low and close are equal and the high creates a long upper shadow. The resulting candlestick looks like an upside down "T" with a long upper shadow and no lower shadow. Gravestone doji indicate that buyers dominated trading and drove prices higher during the session. However, by the end of the session, sellers resurfaced and pushed prices back to the opening level and the session low.
The reversal implications of gravestone doji depend on previous price action and future confirmation. Even though the long upper shadow indicates a failed rally, the intraday high provides evidence of some buying pressure. After a long downtrend, long black candlestick, or at support, focus turns to the evidence of buying pressure and a potential bullish reversal. After a long uptrend, long white candlestick or at resistance, focus turns to the failed rally and a potential bearish reversal. Bearish or bullish confirmation is required for both situations. |
|
|
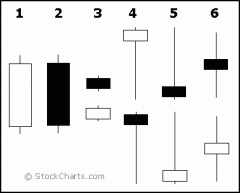
1.Long white candlesticks indicate that the Bulls controlled the trading for most of the day.
2.Long black candlesticks indicate that the Bears controlled the trading for most of the day. 3.Small candlesticks indicate that neither Bulls nor Bears controlled the trading and prices finished about where they started. 4.A long lower shadow indicates that the Bears controlled the trading for part of the day, but lost control by the end and the Bulls made a comeback. 5.A long upper shadow indicates that the Bulls controlled the trading for part of the day, but lost control by the end and the Bears made a comeback. 6.A long upper and lower shadow indicates that both the Bears and the Bulls had their moments during the day, but neither could put the other away, resulting in a standoff. |
|

|
What Candlesticks Don't Tell You
With a long white candlestick, the assumption is that prices advanced most of the session. However, based on the high/low sequence, the session could have been more volatile. The example above depicts two possible high/low sequences that would form the same candlestick. The first sequence portrays strong, sustained buying pressure, and would be considered more bullish. The second sequence reflects more volatility and some selling pressure. These are just two examples, and there are hundreds of potential combinations that could result in the same candlestick. Candlesticks still offer valuable information on the relative positions of the open, high, low and close. However, the trading activity that forms a particular candlestick can vary. |
|

|
Star Position
A candlestick that gaps away from the previous candlestick is said to be in star position. The first candlestick usually has a large real body, but not always, and the second candlestick in star position has a small real body. Depending on the previous candlestick, the star position candlestick gaps up or down and appears isolated from previous price action. The two candlesticks can be any combination of white and black. Doji, hammers, shooting stars and spinning tops have small real bodies, and can form in the star position. |
|
|
Harami Position
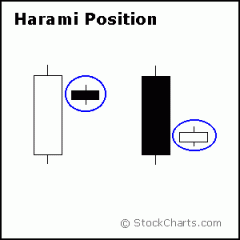
A candlestick that forms within the real body of the previous candlestick is in Harami position. Harami means pregnant in Japanese and the second candlestick is nestled inside the first. The first candlestick usually has a large real body and the second a smaller real body than the first. The shadows (high/low) of the second candlestick do not have to be contained within the first, though it's preferable if they are. Doji and spinning tops have small real bodies, and can form in the harami position as well. |
|
|
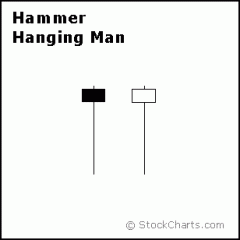
The Hammer and Hanging Man look exactly alike, but have different implications based on the preceding price action. Both have small real bodies (black or white), long lower shadows and short or non-existent upper shadows. As with most single and double candlestick formations, the Hammer and Hanging Man require confirmation before action.
The Hammer is a bullish reversal pattern that forms after a decline. In addition to a potential trend reversal, hammers can mark bottoms or support levels. After a decline, hammers signal a bullish revival. The low of the long lower shadow implies that sellers drove prices lower during the session. However, the strong finish indicates that buyers regained their footing to end the session on a strong note. While this may seem enough to act on, hammers require further bullish confirmation. The low of the hammer shows that plenty of sellers remain. Further buying pressure, and preferably on expanding volume, is needed before acting. Such confirmation could come from a gap up or long white candlestick. Hammers are similar to selling climaxes, and heavy volume can serve to reinforce the validity of the reversal. |
|

|
The Hanging Man is a bearish reversal pattern that can also mark a top or resistance level. Forming after an advance, a Hanging Man signals that selling pressure is starting to increase. The low of the long lower shadow confirms that sellers pushed prices lower during the session. Even though the bulls regained their footing and drove prices higher by the finish, the appearance of selling pressure raises the yellow flag. As with the Hammer, a Hanging Man requires bearish confirmation before action. Such confirmation can come as a gap down or long black candlestick on heavy volume.
|
|

|
The Inverted Hammer and Shooting Star look exactly alike, but have different implications based on previous price action. Both candlesticks have small real bodies (black or white), long upper shadows and small or nonexistent lower shadows. These candlesticks mark potential trend reversals, but require confirmation before action.
The Shooting Star is a bearish reversal pattern that forms after an advance and in the star position, hence its name. A Shooting Star can mark a potential trend reversal or resistance level. The candlestick forms when prices gap higher on the open, advance during the session and close well off their highs. The resulting candlestick has a long upper shadow and small black or white body. After a large advance (the upper shadow), the ability of the bears to force prices down raises the yellow flag. To indicate a substantial reversal, the upper shadow should relatively long and at least 2 times the length of the body. Bearish confirmation is required after the Shooting Star and can take the form of a gap down or long black candlestick on heavy volume. |
|

|
The Inverted Hammer looks exactly like a Shooting Star, but forms after a decline or downtrend. Inverted Hammers represent a potential trend reversal or support levels. After a decline, the long upper shadow indicates buying pressure during the session. However, the bulls were not able to sustain this buying pressure and prices closed well off of their highs to create the long upper shadow. Because of this failure, bullish confirmation is required before action. An Inverted Hammer followed by a gap up or long white candlestick with heavy volume could act as bullish confirmation
|
|

|
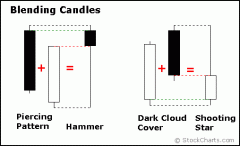
Candlestick patterns are made up of one or more candlesticks and can be blended together to form one candlestick. This blended candlestick captures the essence of the pattern and can be formed using the following:
The open of first candlestick The close of the last candlestick The high and low of the pattern By using the open of the first candlestick, close of the second candlestick, and high/low of the pattern, a Bullish Engulfing Pattern or Piercing Pattern blends into a Hammer. The long lower shadow of the Hammer signals a potential bullish reversal. As with the Hammer, both the Bullish Engulfing Pattern and the Piercing Pattern require bullish confirmation. |
|
|
Blending the candlesticks of a Bearish Engulfing Pattern or Dark Cloud Cover Pattern creates a Shooting Star. The long, upper shadow of the Shooting Star indicates a potential bearish reversal. As with the Shooting Star, Bearish Engulfing, and Dark Cloud Cover, Patterns require bearish confirmation.
|
|

|
More than two candlesticks can be blended using the same guidelines: open from the first, close from the last and high/low of the pattern. Blending Three White Soldiers creates a long white candlestick and blending Three Black Crows creates a long black candlestick.
|

