Reading...
![]()
Play button
![]()
Play button
![]()
Use LEFT and RIGHT arrow keys to navigate between flashcards;
Use UP and DOWN arrow keys to flip the card;
H to show hint;
A reads text to speech;
67 Cards in this Set
- Front
- Back
|
True North
|
.
|
|
|
True North: Point on earth where lines of ___ converge
|
longitude
|
|
|
True North is __ used in order to find ___ when
doing basic land navigation |
not-direction
|
|
|
Direction definition:
|
position of one point in relation to another
point. |
|
|
Direction required elements 2:
|
• An understood base line
• An angle measured from that base line |
|
|
Magnetic North
|

.
|
|
|
Lensatic compass always points to __ __
|
Magnetic North
|
|
|
Magnetic North:
Lines __ __ on map. Used to navigate in the __. |
not shown-field
|
|
|
Grid North
|
.
|
|
|
Grid North:
• ___ lines on the map • Do not converge at __ __ • Based on Military Grid Reference System (MGRS) |
Parallel-North Pole
|
|
|
Declination definition:
|
The angular difference between true north and grid north or magnetic north. Declination is ALWAYS measured from True North.
|
|
|
Magnetic Declination: Measures from __ north to __ north
|
• true - magnetic
• Can be east or west • Usually measured in degrees e.g. 5°W |
|
|
Grid Declination:
Measures from __ north to __ north |
• true - grid
• Can be east or west • Usually measured in degrees e.g. 6°E |
|
|
Azimuth: A horizontal angle measured __ from a __ line. An azimuth can be from any of the three base lines (__)described above.
|
clockwise-base-True North, Magnetic North, or Grid North
|
|
|
A back azimuth is the reverse (plus or minus 180°) of
an azimuth, either __ or __. |
magnetic-grid
|
|
|
Back Azimuth: Less than 180°
|
add 180°
|
|
|
Back Azimuth: More than 180°
|
subtract 180°
|
|
|
The magnetic declination (the relationship between __ north and __ north and, by association, __ north) changes daily in small and largely unpredictable
increments. |
magnetic-true-grid
|
|
|
Three Methods To Update The GM
Angle 3: |
To Update
The GM 1. The method of choice is to call Defense Mapping Agency (DMA) or United States Geological Survey (USGS) and request changes (go through unit intelligence officer, the S-2). 2. Some older maps may have a “projected annual magnetic change” statement at the bottom of the declination diagram. If DMA or USGS cannot be contacted, use this “projected” data. 3. Use a formula |
|
|
Formula to update The GM Angle:
1. Determine the number of __. 2 Multiply the number of years by the __ __. 3 Determine the number of __ of change (if any). 4 Apply change to update GM angle. |
years-annual change-degrees
|
|
|
Sighting Wire: For sighting in on objects for which an exact azimuth is needed
• For compass calibration • Is comparable to the front sight post of the service rifle |
.
|
|
|
Graduated Straightedge
|
.
|
|
|
Luminous Sighting Dots
|

.
|
|
|
Bezel Ring: • Holds the upper glass crystal in place
• Helps preset a direction for night compass navigation • Contains 120 clicks when rotated fully; each click equals 3° |
.
|
|
|
Floating Dial
|
.
|
|
|
Fixed Black Index Line:• Stationary line used as a reference line for determining direction
• When the compass is held properly, the azimuth found directly under the black index line identifies the direction that the compass is pointing |
.
|
|
|
Luminous Magnetic Arrow
|
.
|
|
|
Short Luminous Line
|

.
|
|
|
Lens
|
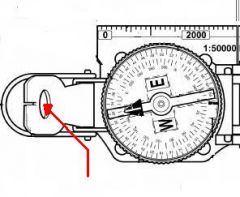
.
|
|
|
Sighting Slot
|
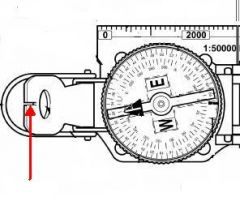
.
|
|
|
Thumb loop: Serves as a retaining device to secure the compass in the closed position
|
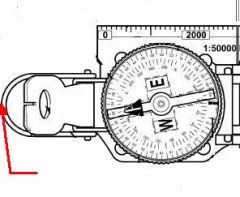
.
|
|
|
Compass dial: • Can be locked in place by closing the __
• Is delicately balanced and free floating when in use • Contains two complete circular scales, one in __ and __ |
eyepiece-Degrees (red scale)-Mils (black scale)
|
|
|
Open your compass to see that the:
|
− Cover glass is not broken, clouded, or cracked
− Compass dial does not stick |
|
|
Inspect the front cover to see if the cover sighting wire is __
|
missing or bent. If it is, use the center of the opening for sighting purposes, not the wire.
|
|
|
Inspect the eyepiece to be sure: (4)
|
− It is placed flat against the cover glass
− The index line on the cover glass bisects the sight slot − With the compass closed, the sighting wire also bisects the sight slot − The eyepiece is not bent. Gently bend the eyepiece back into proper alignment, if necessary. |
|
|
Do not place the compass under a __ __ prior to use; you may damage your compass.
|
light source
|
|
|
The following parts should appear luminous: (4)
|
- The two dots situated at opposite ends of the sighting wire on the front cover
- The luminous line on the crystal - The luminous line on the north-seeking arrow - The luminous dots under the letters "E" and "W" on the face of the compass |
|
|
Maintenance procedures:
• Rinse in __ __, especially after exposure to salt water. • Brush off dirt and grime. • Ensure the "__" on the bezel ring are free of dirt. • Check movement of the __ __ to ensure it is free moving. |
fresh water-ridges-rear sight
|
|
|
It is highly recommended that you __ __ walk through the woods, looking for your objective, with the compass constantly in your hand.
|
DO NOT
|
|
|
Safe Distances in Meters-High tension power lines
|
55
|
|
|
Safe Distances in Meters-Field gun, truck or tank
|
10
|
|
|
Safe Distances in Meters-Telegraph/telephone wires or barbed wire
|
10
|
|
|
Safe Distances in Meters-Machine gun
|
2
|
|
|
Safe Distances in Meters-Service Rifle
|
.5
|
|
|
Kevlar helmets have __ effect.
|
NO
|
|
|
Compass calibration Step 1: Note the calibration point azimuth: the known __ __ from the calibration point to a __ point.
|
magnetic azimuth-designated
|
|
|
Compass calibration Step 2:
Shoot an azimuth from the calibration point to the designated point using the __ technique. Check for effects on your compass from your eyeglasses, watches, rings, etc. If you wear these items in the field, be sure to wear them when calibrating your compass. |
compass-to-cheek
|
|
|
Compass calibration Step 3:
|
Compare azimuths
|
|
|
Comparing azimuths when calibrating: Greater than the calibration point azimuth, then you must __ the difference between the two azimuths (the calibration point value) to your __ magnetic azimuth. Conversely, you must also subtract this value when converting from an actual compass (magnetic) azimuth to a grid azimuth.
|
add-computed
|
|
|
Comparing azimuths when calibrating: Less than the calibration point azimuth, then you must __ the difference between the two azimuths (the calibration point value) from your computed magnetic azimuth. Conversely, you must add this value when converting from an actual compass (magnetic) azimuth to a grid azimuth.
|
subtract
|
|
|
elbows-stomach
|
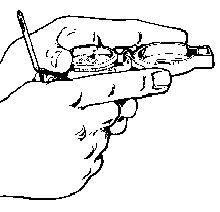
Center Hold Technique
Pull your __ along your sides. The compass should be at __ level. |
|
|
The advantages of the center-hold technique are: (3)
|
Fast and easy
• Under any visibility conditions • Without taking off helmet or removing rifle from sling arms |
|
|
Glance-floating
|
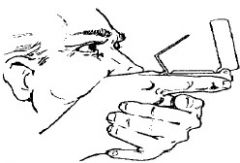
compass-to-cheek technique: __ at the dial to read the azimuth. Ensure the compass dial is __.
|
|
|
The advantages of the compass-to-cheek technique are:
|
− Is more accurate than the center-hold technique
− Is ideal when: Employing intersection and resection techniques A more accurate azimuth is required. |
|
|
Factors Affecting Pace: 7
|
1. Slope
2. Winds 3. Surface 4. Elements 5. Clothing and equipment 6. Stamina 7. Limited visibility/night |
|
|
Attack point- an __ recognizable feature positively identified on the map and on the ground, preferably __ meters or less from your objective.
|
easily-400
|
|
|
Collecting features - features that you plan to __ __ __ to your objective and serve as __.
|
cross en route-checkpoints
|
|
|
Limiting/catching feature - a predetermined feature, preferably linear (such as a stream, finger, or road), __ __ __.
|
beyond your objective
|
|
|
The three basic techniques used for land navigation are
|
dead reckoning, terrain association, and a combination of dead reckoning
and terrain association. |
|
|
Dead Reckoning: 5
|
1. Locate starting point on map
2. Determine the grid azimuth between the two points and convert it to a magnetic azimuth 3. Determine distance and convert pace count 4. Set magnetic azimuth 5. Pick an object in the distance along your azimuth. |
|
|
Factors that may cause you to drift from your intended azimuth are: 4
|
1 Physical attributes
2 Unbalanced load 3 Elements 4 Movement around obstacles |
|
|
Terrain Association
|
The process of using terrain features to guide the navigator to the objective with little or no reliance on the compass.
|
|
|
A combination of dead reckoning and terrain association
|
is the
best method for beginner and intermediate level navigators. Combining dead reckoning and terrain association can be used under almost any conditions of terrain and weather. |
|
|
Orientation via Inspection.
|
orient the
map by aligning recognizable terrain features on the map with the corresponding features on the ground. |
|
|
Orientation to Grid and Magnetic North: 5
|
1. Open the compass so the cover is flat.
2. Align the compass on a N/S grid line (use the straight edge, ensuring the cover points north). 3. Before you orient your map, ensure that you figure in the compass error. 4. Leaving the compass in place, rotate the map until the compass face looks exactly like the declination diagram. 5. Once the map is oriented, leave the map in place and rotate the compass until the straight edge is on a line between your start point and the objective. Now, simply read the azimuth under the black index line. This is the magnetic azimuth--no further conversion need be made. |
|
|
Intentional Offset is a process of intentionally offsetting your magnetic azimuth between:
|
1° and 4° to take advantage of a linear terrain feature.
|
|
|
90° Offset Rule used when
|
you are not able to cross a sizable obstacle.
|