Reading...
![]()
Play button
![]()
Play button
![]()
Use LEFT and RIGHT arrow keys to navigate between flashcards;
Use UP and DOWN arrow keys to flip the card;
H to show hint;
A reads text to speech;
74 Cards in this Set
- Front
- Back
|

|
|
|

|
|
|

|
|
|

|
|
|
Disorders of the hoof capsule:
|
thrush, white line disease, hollow or loose hoof wall, hoof cracks
|
|
|
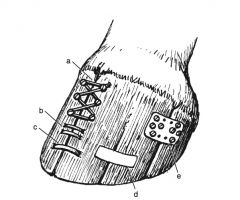
Treatment for hoof cracks:
|
assess/ correct shoeing abnormalities, remove horn adjacent to crack down to sensitive lamina, cover defect with betadine gauze, apply bar shoe with sole packing +/- metal treatment plate, fixation device placed over crack
|
|
|
What is the goal of applying a fixation device to a hoof crack?
|
Unite 2 separate hoof parts to reduce individual movements at transition of normal horn at the level of the coronary band
|
|
|
Methods of fixation for hoof cracks:
|
artificial hoof horn products, umbilical tape around screws in hoof wall, metal hoof wall clamps, metal plates that are glued or screwed to the hoof wall
|
|
|
What is the effect of a keratoma?
|
Unphysiologic pressures exerted on sensitive lamina leading to inflammation and lysis of P3
|
|
|
Treatment of keratoma:
|
entire keratoma is removed, aseptic bandage, once granulation tissue covers defect a medication plate shoe is applied, stall rest for 4-6 weeks, depending on healing light riding after 2-4 months
|
|
|
What are the avenues of chronic hoof abscesses?
|
Along dorsal and lateral wall to break at coronary band, invasion of DIP joint, along and undermining sole resulting in septic P3
|
|
|
Treatment of chronic hoof abscesses:
|
debridement of abscess and infected tissues (P3, DIP joint)
|
|
|
Types of P3 fractures:
|
1: abaxial (wing) without joint involvement; 2:abaxial (wing) with joint involvement; 3: axial (sagittal) or perisagittal with joint involvement; 4: extensor process; 5:comminuted with joint involvement; 6: solar margin
|
|
|
Treatment of type 1 P3 fractures:
|
cast with sole pack or bar shoe with large side clips, NSAIDs, stall rest for 2-4 months
|
|
|
Healing time of type 1 P3 fracture:
|
4-6 months
|
|
|
Radiographic healing time of type 1 P3 fractures:
|
6-12 months
|
|
|
Treatment of type 2 P3 fractures:
|
cast with sole pack or bar shoe with large side clips, NSAIDs, stall rest for 2-4 months if not significantly displaced; if displaced, arthroscopic reduction and lag screw fixation
|
|
|
Non-surgical management of type 3 P3 fracture:
|
cast with sole pack or bar shoe with large side clips, NSAIDs, stall rest for 4 months followed by 4 months of hand walking
|
|
|
Prognosis for non-surgically managed type 3 P3 fractures:
|
better for horses younger than 2, poorer for riding horses
|
|
|
Surgical management of type 3 P3 fracture:
|
arthroscopic reduction, imaging guided placement of lag screw across fracture plane with 1 or 2 4.5 or 5.5 cortex screws
|
|
|
Post-operative care for surgical management of type 3 P3 fracture:
|
stall rest for 4 months, hand walk for 4 months
|
|
|
Complications of surgical management of type 3 P3 fractures:
|
infection, abscess formation, screw may have to be removed
|
|
|
Etiologies of extensor process fractures:
|
hyperextension, avulsion of CDE, osteochondrosis (from separate center of ossification)
|
|
|
Treatment of type 4 P3 fractures:
|
small fragments removed arthroscopically; large fragments can be managed conservatively, lag screw fixation, or removed arthroscopically
|
|
|
Types of NB fractures:
|
avulsion, simple body, comminuted, frontal
|
|
|
What should NB fracture be distinguished from?
|
Bi- or tripartate NB
|
|
|
Non-surgical management of NB fracture:
|
elevated bar shoe for 4 months, small paddock exercise with a wide web shoe for 4+ months or fixation in extremely flexed position in fiberglass cast for up to 6 months
|
|
|
Healing time for NB fracture:
|
10-12 months
|
|
|
Surgical management of NB fracture:
|
lag screw fixation with 3.5 mm cortex screw with radiolucent aiming device & imaging or computer assisted guidance or palmar digital neurectomy
|
|
|
Disadvantages of lag screw fixation of NB fracture:
|
difficulty in placing screw without penetration of DIP joint of DFTS
|
|
|
Healing of lag screw fixation of NB fracture:
|
6-8 months
|
|
|
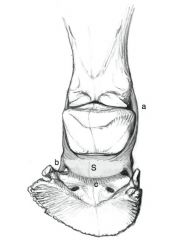
Arthroscopic approaches to DIP joint:
|
dorsal (2 cm proximal to CB, 1.5 cm abaxial to dorsal midline, directed dorsolateral to dorsomedial); palmar (axial to collateral cartilage and neurovascular bundle, abaxial to DDFT at palmar outpouching of joint, directed toward apex of frog); lateral (5mm proximal to convavity of collateral cartilage, 5mm palmar to distal P2, directed parallel to palmar P2)
|
|
|
What is visualized with dorsal DIP arthroscopic approach?
|
Extensor process fragments, distal P2, dorsal synovial membrane
|
|
|
What is visualized with palmar DIP arthroscopic approach?
|
Midsagittal ridge of dorsal border of NB, proximal border of NB, medial and lateral aspect of joint, collateral sesamoidean ligaments
|
|
|
Post-op care for PD neurectomy:
|
stall rest 4 weeks, hand walking 4 weeks
|
|
|
Complications of PD neurectomy:
|
neuritis, neuroma formation, laminitis secondary to blood vessel injury
|
|
|
Methods to prevent neuroma/ neuritis after PD neurectomy:
|
epineural capping, inserting nerve end into hole drilled in P1, ligating nerve, cryoneurectomy, CO2 laser
|
|
|
Approaches for PD neurectomy:
|
1 skin incision, pull-through (2 incision)
|
|
|
Goal of high lateral and medial palmar neurectomy:
|
disrupt afferent and efferent nerve tracts proximal to the division into palmar and dorsal branches to prevent pain from chronic disease
|
|
|
Where is high lateral and medial palmar neurectomy performed?
|
Proximal to DFTS
|
|
|
Surgical management options for navicular disease:
|
navicular suspensory desmotomy, PD neurectomy, periarterial sympathectomy
|
|
|
Mechanism of navicular suspensory desmotomy:
|
reduces forces on the NB and perinavicular structures with caudal weight bearing phase of stride (when navicular suspensory ligaments are loaded), transection of sensory fibers within CSL
|
|
|
What are the suspensory ligaments of the NB?
|
Collateral sesamoidean ligament (from distal P1 to NB), impar ligament (from distal NB to palmar P3) and chondrosesamidean ligament (from abaxial NB to abaxial P3)
|
|
|
Approaches to desmotomy of CSL:
|
open, arthroscopic
|
|
|
Describe open CSL desmotomy:
|
4cm vertical incision midway between CDE and distal eminence of P1 from eminence to CB, retract superficial vessels, isolate CSL, transect with scalpel, repeat on opposite side
|
|
|
Describe arthroscopic CSL desmotomy:
|
palmar arthroscopic approach medial and lateral, identification of CSL, transection with hook knife, repeat on opposite side
|
|
|
Post-op care for CSL desmotomy:
|
bandaging and stall rest for 10 days until suture removed, hand walking for 3 weeks, gradual return to full work at 3 months
|
|
|
Conditions associated with poor response to CSL desmotomy:
|
flexor cortex defects, proximal border enthesiophytes, mineralization of DDFT, medullary sclerosis of NB
|
|
|
Indications for CSL desmotomy:
|
new bone growth at insertion of CSL
|
|
|
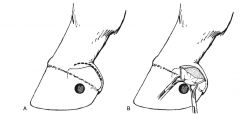
Describe perivascular sympathectomy and fasciolysis:
|
10cm skin incision centered over PSB, isolation of neurovascular bundle, removal of perivascular tissues and perineural tissues, close incision
|
|
|
Mechanism of perivascular sympathectomy:
|
dissection of sympathetic nerve supply to vessels resulting in prolonged vasodilation
|
|
|
Surgical management options for chronic laminitis:
|
DDFT tentomy
|
|
|
Approaches to DDFT tenotomy:
|
mid-pastern, mid-MC
|
|
|
Mechanism of DDFT tenotomy:
|
reduces palmar directed forces of DDFT on P3 which decreases shear stress on dorsal lamina, reduces pressure on apex of P3 on corium of sole, lowering of heel to allow more natural alignment of P3
|
|
|
Benefits of mid-MC DDFT tenotomy:
|
easier to perform, can be performed standing, does not invade DFTS so less risk of post-op infection, leaves some support for DIP joint
|
|
|
Describe mid-MC DDFT tenotomy:
|
vertical incision lateral aspect of proximal to mid-third of MC, DDFT separated from neurovascular bundle, ALDDFT, SDFT and elevated from incision, leg lifted, DDFT transected OR blind transection with blunt bistoury knife while standing
|
|
|
Complications of mid-MC DDFT tenotomy:
|
damage/ laceration of neurovascular structures
|
|
|
Describe mid-pastern DDFT tenotomy:
|
3 cm vertical incision in pastern region, 1 cm proximal to heel bulbs, DDFT exposed, elevated, transected
|
|
|
Which DDFT tenotomy approach has the most separation of the DDFT?
|
mid-pastern because no other attachments of DDFT except for distal P3
|
|
|
Post-op care for DDFT tenotomy:
|
bandage and stall rest for 6 weeks, shoe with heel extension for 6-8 weeks
|
|
|
Complications of DDFT tenotomy:
|
infection, post-op pain
|
|
|
Source of post-op pain for DDFT tenotomy:
|
overloading SDFT, OA DIP joint, chronic infection of P3
|
|
|
What ruminant digit is mostly likely to be affected by disease?
|
Lateral hind
|
|
|
Most common location of digital fracture in ruminants?
|
Lateral hind, medial fore
|
|
|
Treatment of ruminant digital fracture:
|
wooden block on healthy digit, affected digit wired to healthy digit in slight flexion
|
|
|
Surgical options for septic DIP joint in ruminants?
|
Digit amputation, facilitated ankylosis
|
|
|
Advantages of ruminant digit amputation:
|
rapid, inexpensive procedure, all infected tissue removed, rapid return to production
|
|
|
Disadvantages of ruminant digit amputation:
|
production life is reduced, poor cosmesis, heavy animals do poorly
|
|
|
Advantages of facilitated ankylosis of ruminant DIP joint:
|
longer production life, better for heavier animals or when lateral hind or medial front affected, more cosmetic, more mechanically stable
|
|
|
Disadvantages of facilitated ankylosis of ruminant DIP joint:
|
expensive, technically challenging, more post-op care, slower return to production
|
|
|
Approaches to facilitated ankylosis of ruminant DIP joint:
|
solar, dorsal
|
|
|
Advantages of solar DIP ankylosis in ruminants:
|
good visualization of joint, excellent drainage, good long term prognosis
|
|
|
Disadvantages of solar DIP ankylosis in ruminants:
|
difficult approach, resection of distal sesamoid bone, DDFT, and tendon sheath cause instability
|
|
|
Advantage of dorsal DIP ankylosis in ruminants:
|
DDFT and distal sesamoid bone are not affected, easy & less invasive, more stable approach compared with solar approach
|