Reading...
![]()
Play button
![]()
Play button
![]()
Use LEFT and RIGHT arrow keys to navigate between flashcards;
Use UP and DOWN arrow keys to flip the card;
H to show hint;
A reads text to speech;
102 Cards in this Set
- Front
- Back
|
eyepiece
|

this is where your eyes look through. Eyepiece lenses magnify at 10x power (a)
Lab Module 2: Basics of Microscopy |
|
|
Diopter Ring
|

this is what you adjust on one of your eyepieces to account for the fact that your eyes are not equally strong. (a)
Lab Module 2: Basics of Microscopy |
|
|
Objective Lenses
|

series of lenses located on the nosepiece that further increase the magnification of what you're viewing (c)
Lab Module 2: Basics of Microscopy |
|
|
nosepiece
|

holds the objective lenses; rotates to allow you to change between lenses (b)
Lab Module 2: Basics of Microscopy |
|
|
stage
|

where the slide or sample sits (d)
Lab Module 2: Basics of Microscopy |
|
|
condenser
|

contains a lens that helps focus the light on your subject. is adjusted by the condenser knob that looks similar to the coarse adjustment. (e)
Lab Module 2: Basics of Microscopy |
|
|
diaphragm
|

adjusts how much light makes it from the light source to the condenser lens. Opening and shutting it allows you to adjust the contrast. (e)
Lab Module 2: Basics of Microscopy |
|
|
light source
|
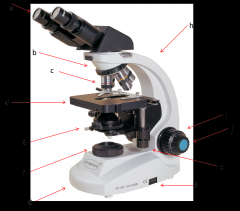
where the light is coming from (f)
Lab Module 2: Basics of Microscopy |
|
|
arm
|

hold this when moving the microscope (h)
Lab Module 2: Basics of Microscopy |
|
|
base
|

place one hand under this when moving the microscope (g)
Lab Module 2: Basics of Microscopy |
|
|
coarse adjustment
|

moves the stage or objective lenses slowly to allow for approximate focusing. use of the coarse adjustment precedes use of the fine adjustment (i)
Lab Module 2: Basics of Microscopy |
|
|
fine adjustment
|

moves the stage or objective lenses slowly to allow for fine focusing (j)
Lab Module 2: Basics of Microscopy |
|
|
coaxial stage control
|

allows you to move the slide in the X-Y directions without touching the slide. Also has markings to allow you to return to a specific spot which can be very helpful. (k)
Lab Module 2: Basics of Microscopy |
|
|
rheostat
|

this is the adjustable control for the light source. this is one way you have to adjust the amount of light hitting your sample. (l)
Lab Module 2: Basics of Microscopy |
|
|
simple staining
|
when one single stain is used to target general (or none) features. Ex: when India Ink staining - allows us to look at cell shape, but is not binding to any features of the different types differently.
Lab module 3: Visualizing features of bacteria via stains + microscopy |
|
|
differential staining
|
when multiple stains are used to color features differentially. Ex: gram stain - differentially colors cells based on their wall type.
Lab module 3: Visualizing features of bacteria via stains + microscopy |
|
|
positive stain
|
stains the object/feature but not the background. Ex: gram stain
Lab module 3: Visualizing features of bacteria via stains + microscopy |
|
|
negative stain
|
stains the background but not the object/feature. Ex: India Ink stain
Lab module 3: Visualizing features of bacteria via stains + microscopy |
|
|
Gram positive bacteria
|

technically, a bacterium that gives a positive result for the Gram staining technique. Reflective of the cell wall composition
Lab module 3: Visualizing features of bacteria via stains + microscopy |
|
|
Gram negative bacterium
|

technically, a bacterium that gives a negative result for the Gram staining technique. Reflective of the cell wall composition
Lab module 3: Visualizing features of bacteria via stains + microscopy |
|
|
endospore
|
a resistant dormant structure produced by some bacteria
Lab module 3: Visualizing features of bacteria via stains + microscopy |
|
|
flagellum
|
a bacterial filamentous structure extending off of a cell that is used for motility
Lab module 3: Visualizing features of bacteria via stains + microscopy |
|
|
capsule
|
a polysaccharide layer that can surround some bacteria and give them extra protection
Lab module 3: Visualizing features of bacteria via stains + microscopy |
|
|
flaming
|
applying a flame to something like an innoculation loop, a slide, or the mouth of a test tube.
Lab module 3: Visualizing features of bacteria via stains + microscopy |
|
|
gram stain
|
staining procedure used to distinguish between bacteria having one of two types of cell wall composition.
Lab module 3: Visualizing features of bacteria via stains + microscopy |
|
|
KOH test
|
KOH is potassium hydroxide. This is a specialized simplified test that can also be used to assess if a bacteria is of the Gram positive or Gram negative type.
Lab module 3: Visualizing features of bacteria via stains + microscopy |
|
|
counterstain
|
a stain that when applied shows a different color than a previously applied stain
Lab module 3: Visualizing features of bacteria via stains + microscopy |
|
|
mordant
|
any substance that helps 'fix' a dye to a sample. Iodine is a mordant in the gram stain technique
Lab module 3: Visualizing features of bacteria via stains + microscopy |
|
|
inoculation loop
|
specialized metal loop that is used to transfer bacteria from a source to new medium. Since its metal, it can be flamed to sterilize it between transfers.
Lab module 3: Visualizing features of bacteria via stains + microscopy |
|
|
flooding
|
applying a reagent/stain in imprecise volumes that fully cover the sample on the slide.
Lab module 3: Visualizing features of bacteria via stains + microscopy |
|
|
destaining
|
application of a solution that removes stains from a sample.
Lab module 3: Visualizing features of bacteria via stains + microscopy |
|
|
bacilli
|
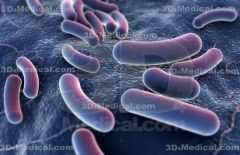
rod shaped bacteria
Lab module 3: Visualizing features of bacteria via stains + microscopy |
|
|
coccus
|
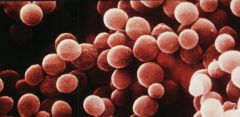
sphere shaped bacteria
Lab module 3: Visualizing features of bacteria via stains + microscopy |
|
|
Vibrio
|

spiral shaped bacteria
Lab module 3: Visualizing features of bacteria via stains + microscopy |
|
|
tetrad
|
term applied to describe the number of cells (usually cocci) when they are clustered into groups of 4
Lab module 3: Visualizing features of bacteria via stains + microscopy |
|
|
diplococcus
|
term applied to describe the number of cells (usually cocci) when they are clustered into groups of 2
Lab module 3: Visualizing features of bacteria via stains + microscopy |
|
|
mycelia
|
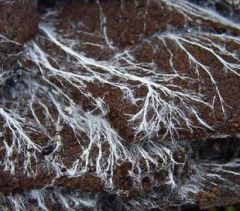
a long filamentous structure. these structures can be formed by long chains of bacteria or fungi
Lab module 3: Visualizing features of bacteria via stains + microscopy |
|
|
fixing
|
the process of making bacteria adhere to a slide. can be performed by applying heat or methanol.
Lab module 3: Visualizing features of bacteria via stains + microscopy |
|
|
bibulous paper
|
special paper used to absorb excess stains off of slides. Made so that it does not leave behind fibers that would interfere with microscopy.
Lab module 3: Visualizing features of bacteria via stains + microscopy |
|
|
crystal violet stain
|
a basic stain taken up by Gram positive bacteria
Lab module 3: Visualizing features of bacteria via stains + microscopy |
|
|
iodine stain
|
acts as a mordant. it combines with Crystal violet so that it can't leave the cell.
Lab module 3: Visualizing features of bacteria via stains + microscopy |
|
|
safranin
|
a basic stain used as a counterstain in the Gram staining technique
Lab module 3: Visualizing features of bacteria via stains + microscopy |
|
|
india ink
|
a nonspecific dark stain used for negative staining
Lab module 3: Visualizing features of bacteria via stains + microscopy |
|
|
ascus/asci
|
the "sac" that holds ascospores
Lab Module 3: Fungi |
|
|
ascospore
|

sexual spores made by ascomycetes
Lab Module 3: Fungi |
|
|
yeast
|
a single-celled form that some fungi can take
Lab Module 3: Fungi |
|
|
budding
|
a form of asexual reproduction involving cell division where the new cell emerges as a small cell from the original cell
Lab Module 3: Fungi |
|
|
penicillus
|
the brush-like asexual spore-bearing structure formed by fungi from the genus 'Penicillium
Lab Module 3: Fungi |
|
|
aspergillum
|
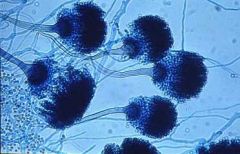
the asexual spore-bearing structure formed by fungi from the genus Aspergillus. Named after the device used in certain religious ceremonies to sprinkle holy water on their constituents.
Lab Module 3: Fungi |
|
|
sporophore
|
the structure supporting asexual spores on fungi (mushrooms)
Lab Module 3: Fungi |
|
|
hypha/hyphae
|
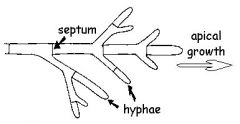
a filamentous structure composed of a series of elongated cells.
Lab Module 3: Fungi |
|
|
mycelium
|
a mass of hyphae
Lab Module 3: Fungi |
|
|
basidiospore
|

sexual spores made by bysidiomycetes
Lab Module 3: Fungi |
|
|
basidium/basidia
|

the club-like structure that gives rise to basidiospores. On a mushroom, these can be found on the gill surface at the end of sterile hyphae.
Lab Module 3: Fungi |
|
|
sterigma
|
the little points that hold up the basidiospores on the basidium
Lab Module 3: Fungi |
|
|
zygospore
|
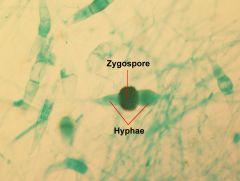
thick-walled sexual spores made by zygomycetes
Lab Module 3: Fungi |
|
|
lactophenol cotton blue
|
stain used to view fungi
Lab Module 3: Fungi |
|
|
liquid media
|
any media that is in a liquid form
Lab Module 5: Media and dry goods preparation |
|
|
solid media
|
media that is in a solid form
Lab Module 5: Media and dry goods preparation |
|
|
agar
|
polysaccharide that is added to liquid that allows it to gel into a solid form.
Lab Module 5: Media and dry goods preparation |
|
|
autoclave
|
essentially a giant pressure cooker. Because the heatin chamber is under pressure, it allows liquids to reach temperatures of 121 deg C (which is above boiling). In many offices/labs there are desktop versions but here we have a large industrial sized autoclave.
Lab Module 5: Media and dry goods preparation |
|
|
test tubes
|
standard long tube used in many biological labs, however in microbiology we typically keep a cap over them. The cap fits loosely which allows gas to enter but not contaminants in the air
Lab Module 5: Media and dry goods preparation |
|
|
petri dish/petri plate
|
the special plate and cover that solid media gets poured into. the cover sits loosely enough that gases can enter.
Lab Module 5: Media and dry goods preparation |
|
|
autoclave tape
|
special tape that will have words appear when 121 deg C temperatures have been reached. A small piece of this tape is placed onto media or solid goods prior to autoclaving.
Lab Module 5: Media and dry goods preparation |
|
|
slant tubes
|
test tubes with solid media in them that has been allowed to solidify at an angle. This angle eventually allows greater surface area for inoculation of the tubes at a later time and is a common way to maintain cultures.
Lab Module 5: Media and dry goods preparation |
|
|
parafilm
|
a breathable stretchy, waxy, film that is used to seal Petri dishes to keep contamination out while still allowing gas exchange.
Lab Module 6: Basic culturing skills and sterile techniques |
|
|
inoculation loop
|
a metal loop at the end of a metal stick that is used to transfer bacteria and to streak them on a plate. Because it is metal, it can be heated by flame to sterilize it before and after each use. The loops can come in different sizes and are actually set to deliver a constant specific quantity of liquid. Most of the loops in our lab can hold 10ul.
Lab Module 6: Basic culturing skills and sterile techniques |
|
|
stick spreader (aka. hockey stick)
|
a bent glass or metal rod that can be used to spread microbes across a plate. Because it is glass or metal, it can be sterilized with heat before and after each use.
Lab Module 6: Basic culturing skills and sterile techniques |
|
|
spread plate
|
describes a media plate where the sample has been spread across the entire plate.
Lab Module 6: Basic culturing skills and sterile techniques |
|
|
streak plate
|
a type of plating where bacteria are streaked along the plate.
Lab Module 6: Basic culturing skills and sterile techniques |
|
|
lawn
|
a thick growth across most of the plate where you cannot distinguish individual colonies at all.
Lab Module 6: Basic culturing skills and sterile techniques |
|
|
colony
|
an area of bacterial growth where the bacteria all originated from one bacterium theoretically. characteristics of the colonies (ex. margin form, height, coloration, etc) can be used to somewhat distinguish different species from each other.
Lab Module 6: Basic culturing skills and sterile techniques |
|
|
shaker
|
allows liquid media to be shaken while being incubated. The shaking specifically allows better aeration of the liquid. Flasks are shaken upright but the test tubes must be shaken at an angle.
Lab Module 6: Basic culturing skills and sterile techniques |
|
|
incubator
|
any box, refrigerator or controlled temperature device that allows us to maintain cultures at specific temperatures.
Lab Module 6: Basic culturing skills and sterile techniques |
|
|
sterile/negative control
|
a sample that you use to ensure that your media and/or your techniques are not prone to contamination. If you see growth in the negative control, then you need to reexamine your technique.
Lab Module 6: Basic culturing skills and sterile techniques |
|
|
cotton swab
|
simply a cotton swab that is purchased sterile. Can be used to swab off bacteria from a solid surface and then transfer the bacteria to another sample.
Lab Module 6: Basic culturing skills and sterile techniques |
|
|
suspension
|
taking cells from a solid medium and suspending them into a liquid. A convenient way to get cells into liquid medium but realize too that the cells will initially be in whatever state they were in on the plate.
Lab Module 6: Basic culturing skills and sterile techniques |
|
|
proper plate labeling
|
should include 1.) date; 2.) your group names; 3.) media type, and 4.) what was inoculated into it.
Lab Module 6: Basic culturing skills and sterile techniques |
|
|
turbidity
|
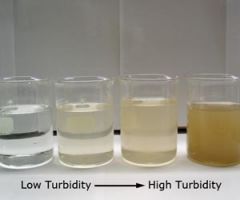
the appearance of things inside a liquid culture. By swirling a tube, you can observe if the sample is turbid. Any degree of turbidity indicates bacterial growth.
Lab Module 6: Basic culturing skills and sterile techniques |
|
|
morphotype
|
the shape/color/texture of the colonies. Ex: bacteria whose colonies differ in these features are said to exhibit different morphotypes.
Lab Module 6: Basic culturing skills and sterile techniques |
|
|
subculture
|
transfer of bacteria from a previous culture to fresh media.
Lab Module 6: Basic culturing skills and sterile techniques |
|
|
direct count method
|
a method of counting a culture that involves counting each separate organism present in a small sub-sample of that colony. Use the count of the small sample to extrapolate the actual population size.
Primary advantage is that you don't have any biases due to microbes not growing well in culture. Disadvantage is that you can't distinguish the living, growing cells from the dormant or dead cells. Lab Module 8: Quantitation of Bacteria |
|
|
hemocytometer
|
originally designed to count red blood cells (name); a very precise grid that has varying square sizes in it.
Lab Module 8: Quantitation of Bacteria |
|
|
clickers (hand tally-counters
|
allow you to keep a tally of how many cells you are seeing without having to take your eyes off of the microscope and lose your place.
Lab Module 8: Quantitation of Bacteria |
|
|
dilution series
|
a quick and convenient way to 1.) get a very dilute sample that is accurately measured and 2.) provide us with a range of concentrations of something so that we can figure out what concentration works best for whatever test we're doing.
Lab Module 8: Quantitation of Bacteria |
|
|
MPN count
|
most probable number count - relies on the probability that you will get one or more bacterium into a tube as you dilute the sample down.
Lab Module 8: Quantitation of Bacteria |
|
|
turbidimetric measurements
|
measures the passage of light through a culture (the more cells, the more light is absorbed)
Lab Module 8: Quantitation of Bacteria |
|
|
bla
|
gene coding for beta-lactamase protein. This enzyme cuts the B-lactam rings in ampicillin, thereby allowing any bacterium that has this gene to survive in the presence of ampicillin.
Lab Module 12: Transformation and plasmids in bacteria |
|
|
Ori
|
the origin replication site for this plasmid
Lab Module 12: Transformation and plasmids in bacteria |
|
|
GFP
|
the gene for green fluorescent protein, originally isolated from a jellyfish but inserted into this plasmid. In this plasmid, the GFP gene has a promoter that is recognized by the activated araC protein. The green fluorescent protein luminesces when exposed to ultraviolet light.
Lab Module 12: Transformation and plasmids in bacteria |
|
|
araC
|
the gene for the araC protein. When bound to arabinose, this protein acts as a transcription factor and binds the promoter region that has been placed in front of GFP.
Lab Module 12: Transformation and plasmids in bacteria |
|
|
E. coli HB101
|
this is a specific strain of E. coli that works very well with the plasmid used in lab. Keep in mind that not all bacteria are easily made competent, and not all bacteria will have this appropriate ori proteins to allow maintenance of the pGLO plasmid.
Lab Module 12: Transformation and plasmids in bacteria |
|
|
Transformation solution
|
this is a commercially made solution that contains the CaCl2. CaCl2 is important in steps to make cells artificially competent as it is thought to form holes in the wall/membrane.
Lab Module 12: Transformation and plasmids in bacteria |
|
|
ampicillin
|
an antibiotic that should effectively halt growth of any of the bacteria that do not have an active b-lactamase gene.
Lab Module 12: Transformation and plasmids in bacteria |
|
|
titer
|
the quantity of the virus present in a solution
Lab Module 13: Viruses |
|
|
plaque
|
a cleared zone in a bacterial lawn that occurred due to the viral infection and lysis of bacteria.
Lab Module 13: Viruses |
|
|
PFU
|
plaque-forming unit - the viral equivalent of cfu
Lab Module 13: Viruses |
|
|
bacteriophage
|

a bacteria-infecting virus
Lab Module 13: Viruses |
|
|
capsid
|
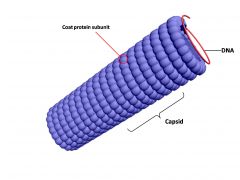
the protein coat that protects the nucleic acid of a virus.
Lab Module 13: Viruses |
|
|
coliphage
|
a phage that specifically attacks E. Coli.
Lab Module 13: Viruses |
|
|
Describe how to adjust the microscope to account for the fact that both of your eyes are different strengths
|
Use the diopter ring to adjust for this.
Lab Module 2: Basics of Microscopy |
|
|
Be able to describe the appropriate lab safety policies or the location of key safety information or items
|
Appropriate dress (no skin exposed below the belt)
No food or drink in lab ever, includes water bottles Fire/emergency safety - Backpacks, Location of exits, fire extinguisher, eye washes, shower, phones, emergency contacts, MSDS Proper disposal considerations – live material, sharps, stains, etc. Working with live cultures - treat all cultures as if they are pathogens Lab cleanliness Proper labeling of cultures, tubes, etc. Short term – can be brief - Group ID (first initials of your first names) Beyond class – Date, Group ID, contents, media type Station preparation and cleaning after lab Wipe down with dilute Simple Green Lab technique points – includes all safety and cleaning 1-2 pt penalty each infraction, start with 5 points |