![]()
![]()
![]()
Use LEFT and RIGHT arrow keys to navigate between flashcards;
Use UP and DOWN arrow keys to flip the card;
H to show hint;
A reads text to speech;
221 Cards in this Set
- Front
- Back
|
EMS |
Emergency Medical Services |
|
|
Peace officer primary responsibilities as first responder |
As first responders, peace officers should assume the primary responsibility for: |
|
|
En route to the scene |
The primary objective of all peace officers responding to any emergency call should be to get to the location as quickly and safely as possible. |
|
|
Scene size-up |
At the scene peace officers should evaluate the nature of the incident and communicate critical information to dispatch and other involved units as soon as possible.
• Location - Exact address or location of the incident • Type of emergency • Nature of ill/injured persons • Need for additional resources • Urgent enforcement actions required - Protection of victim(s) from aggressor(s)
|
|
|
Safety precautions |
When determining appropriate safety precautions to take, peace officers should consider possible dangers from: |
|
|
Assessment and care of victim |
• Based on this initial assessment, peace officers may be required to provide basic care for the victim.
• Such care may include providing basic emergency medical services (EMS) until relieved of the responsibility by other personnel with equal or higher levels of training. |
|
|
Law enforcement actions |
If the care and well-being of the victim has been turned over to other EMS personnel, peace officers may be required to continue additional enforcement actions including: |
|
|
Pathogens |
Infection and disease are caused by pathogens that are spread through the air or by contact with another person’s blood or body fluids. |
|
|
Bacteria |
• Bacteria are microscopic organisms that can live in water, soil, or organic material, or within the bodies of plants, animals, and humans.
• Only when a bacteria is harmful would it be considered a pathogen. |
|
|
Virus |
• A virus is a submicroscopic agent that is capable of infecting living cells.
• Once inside the cells of plants, animals, or humans, viruses can reproduce and cause various types of illness or disease. |
|
|
2 primary methods of transfer of pathogens |
• Airborne • Blood borne |
|
|
Airborne pathogens |
• Airborne pathogens are spread by tiny droplets sprayed during breathing, coughing, or sneezing.
• Airborne pathogens can be absorbed through the eyes or when contaminated particles are inhaled. |
|
|
Blood borne pathogens |
Blood borne pathogens may be spread when the blood or other body fluids (e.g., semen, phlegm, mucus, etc.) of one person comes into contact with an open wound or sore of another |
|
|
Chain of transmission |
Chain of transmission is how pathogens are spread such as: |
|
|
Exposure |
• Because of the nature of their occupation, peace officers are at a high risk of being exposed to both airborne and blood borne pathogens.
• NOTE: Exposure does not necessarily mean an individual will contract the illness |
|
|
Personal protective equipment (PPE) |
• By using personal protective equipment (PPE), EMS personnel can break the chain of transmission and prevent possible exposure and infection. • Equipment to be effective, must be used and cared for properly. • Dispose of properly. |
|
|
Types of PPE |
• Protective gloves - vinyl/non-latex (some allergic to latex) - single use - put on before contact - change between victims • Eye protection • Masks • Gowns • Ventilation devices (portable pocket masks and one-way valve filters) • General supplies and equipment - cleaning solutions/disinfectants - antimicrobial wipes - puncture resistant disposable containers - biohazard disposable bags
NOTE: Penal Code Section 13518.1 requires that law enforcement agencies provide peace officers with appropriate portable masks and instruct officers on the mask’s proper use. |
|
|
UNIVERSAL PRECAUTIONS |
• Treat all body fluids as if they are contaminated!
|
|
|
Personal preventive measures |
• Peace officers should also be aware of personal preventive measures they may take to remain healthy and support their own immune systems.
• Staying in good physical condition can help breach the chain of transmission of pathogens to which they may be exposed |
|
|
Documentation to exposure |
If a peace officer is exposed to an infectious pathogen (or even suspects exposure), no matter how slight, that officer should report the exposure verbally and in writing as soon as possible. |
|
|
Responsibility to act |
As trained professionals, peace officers have a responsibility to:
|
|
|
Immunity from liability |
The California Legislature has declared that emergency rescue personnel qualify for immunity from liability from civil damages for any injury caused by an action taken when providing emergency medical services under certain specified conditions. (Health and Safety Code Section 1799.102)
|
|
|
Negligence |
• If peace officers attempt to provide emergency medical services beyond the scope of their training, or if they act in a grossly negligent manner, they can be held liable for any injuries they may cause.
|
|
|
Expressed consent |
Peace officers should clearly identify themselves and ask for consent to administer emergency medical services. Consent (i.e., permission) must be obtained from the ill or injured person before providing emergency care.
|
|
|
Implied consent |
Implied consent is a legal position that assumes that an unconscious or confused victim would consent to receiving emergency medical services if that person were able to do so.
|
|
|
Refusal of care |
A conscious and competent adult has the right to refuse any emergency medical services offered by emergency rescue personnel.
The refusal must be honored as long as the person is mentally competent.
|
|
|
Life-threatening conditions |
If it is determined that an illness or injury is such that if left untreated the victim’s condition will degenerate to a life-threatening condition, the emergency rescue personnel may provide medical services regardless of the victim’s conscious condition |
|
|
DNR - Do not resuscitate |
Individuals who are terminally ill may have given specific do not resuscitate (DNR) instructions
Peace officers are responsible for being aware of and complying with state and local policies and guidelines regarding following such instructions in an emergency situation.
A valid “do not resuscitate” (DNR) or “no-CPR” directive would also be a reason for not beginning CPR on a victim. If there is doubt that the order may not be valid start CPR |
|
|
Duty to continue (providing care) |
Once a peace officer initiates medical services, that officer must remain with the victim until the officer is relieved by: |
|
|
Victim assessment - 2 part process |
Primary assessment Secondary assessment |
|
|
Primary assessment |
Rapid, systematic process to detect life-threatening conditions
1 - Check for responsiveness |
|
|
Secondary assessment |
Systematic examination to determine whether injuries exist
1 - Check and document vital signs: |
|
|
Respiration |
The act of breathing is called respiration |
|
|
Responsiveness |
•Before taking any action, the victim’s level of responsiveness (mental status) should be determined. •To determine responsiveness, the peace officer should speak with the victim directly, asking, “Are you okay?” •If the victim does not respond, the officer should tap the victim or shout in order to elicit a response from the victim.
|
|
|
Primary assessment - responsiveness |
IF the victim is UNRESPONSIVE
IF the victim is RESPONSIVE |
|
|
Primary assessment - breathing |
The responding peace officer should determine if the victim is breathing.
When a victim is alert and able to speak, it can be assumed that the victim has a clear airway and is able to breath.
|
|
|
Primary assessment - circulation (pulse) |
The presence of a pulse is an indication that the victim’s heart is functioning.
1 - Place an index and middle finger on the front of the victim’s throat at the largest cartilage of the larynx (“Adam’s apple”).
IF the victim has NO PULSE
IF the victim has PULSE, BREATHING, BUT UNCONSCIOUS
IF the victim has PULSE, BREATHING, CONSCIOUS |
|
|
Brachial artery |
For infants under one year, circulation should be assessed on the brachial artery (inside upper arm between biceps and triceps). |
|
|
Multiple victim assessment |
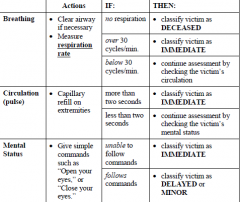
Peace officers should move from one victim to another, making a quick (less than one minute) assessment of each victim’s condition and classifying each victim into a category.
Classification categories should be based on assessment of the victim’s breathing, circulation, and mental status.
• Deceased • Immediate • Delayed • Minor |
|
|
Multiple victim assessment
Classification - deceased |
No respiration after opening the airway |
|
|
Multiple victim assessment
Classification - immediate |
Receives treatment first, once all victims are classified |
|
|
Multiple victim assessment
Classification - delayed |
Receives treatment once all victims classified as IMMEDIATE have been treated |
|
|
Multiple victim assessment
Classification - minor |
Direct to a safe area away from other victims and possible scene safety hazards |
|
|
Multiple victim assessment
Assessment criteria |
|
|
|
Moving a victim - do not move |
More harm can be done to a victim by moving them than by the original injury. This is especially true if a spinal cord injury is suspected.
|
|
|
Moving a victim - conditions for moving a victim |
A victim should be moved only when the victim is in a life-threatening situation.
• Imminent danger - When the danger outweighs the risk of further injury from being moved • Unable to assess - - When it is not possible to do a primary survey of the victim’s condition, i.e., slumped over steering wheel |
|
|
Moving a victim - guidelines |
Plan ahead • Identify a safe location before attempting to move the victim
Reassure the victim • Tell the victim(s) what is going on and why the victim is going to be moved
Victim stability • Keep victim in a straight line during the movement |
|
|
Moving a victim - shoulder drag |
One maneuver that may be used is the shoulder drag technique.
1 - Use hands and grasp the victim under the armpits. |
|
|
Cardiac arrest |
If a victim is unresponsive, not breathing, and has no definite carotid pulse to indicate circulation, then the victim is in a state of cardiac arrest. |
|
|
CPR |
Cardiopulmonary Resuscitation (CPR) is a method of artificially restoring and maintaining a victim’s breathing and circulation. CPR is a key element of basic life support.
|
|
|
Clinical death |
A victim is clinically dead the moment breathing and circulation stop.
Clinical death may be reversible if basic life support techniques such as CPR are initiated immediately.
If any doubt exists as to whether or not the victim is alive, CPR should be started. |
|
|
Biological death |
When a victim’s breathing and circulation stop and brain cells die due to lack of oxygen, irreversible changes begin to take place, and vital organs begin to deteriorate.
At this point, a victim is biologically dead.
Biological death usually takes place within four to six minutes after breathing and circulation stop. |
|
|
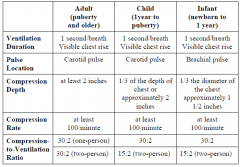
Adult CPR: One Person |
Determine responsiveness
• Put the heel of one hand on the center of the victim’s chest on the lower half of the breastbone
Ventilation
NOTE: If unsure there is a pulse, continue CPR. |
|
|
Adult CPR: Two Person |
Determine responsiveness
• Push hard and fast
Ventilation
Compression Cycle
NOTE: If unsure there is a pulse, continue CPR.
|
|
|
Child CPR: One Person |
The technique for performing CPR on a child, (one year to puberty) is similar to that for adults, but with adjustments that take into account the child’s size.
Determine responsiveness
Chest Compressions • Position yourself at the child’s side
Ventilation
|
|
|
Child CPR: Two Person |
Determine responsiveness
Pulse check
Chest Compressions
|
|
|
Infant CPR: One Person |
The technique for performing CPR on a infant, (under one year of age) is similar to that for a child, but with adjustments that take into account the infant’s size.
Determine responsiveness
Chest compression
|
|
|
Infant CPR: Two Person |
Determine responsiveness
Chest compression
Ventilation
|
|
|
Pausing CPR |
Minimize interruptions in compressions to 10 seconds or less.
|
|
|
Stopping CPR |
CPR must be continued until: |
|
|
AED |
Automated External Defibrillators (AED)
The best treatment for most cases of sudden cardiac arrest is immediate treatment with a defibrillator, a device that shocks the heart out of fatal rhythm, allowing normal, healthy rhythm to resume. |
|
|
AED Protocol |
The AED protocol has seven basic steps: |
|
|
AED Cautions |
AEDs are designed to be used for adults, children and infants.
|
|
|
Respiratory failure |
Respiratory failure is the inability to intake oxygen, to the point where life cannot be sustained. |
|
|
Respiratory arrest |
When breathing stops completely, the victim is in respiratory arrest |
|
|
Cardiac arrest |
A state when a victim is unresponsive, not breathing, and has no carotid pulse to indicate circulation |
|
|
Airway obstructions - consideration for spinal cord injury |
Prior to any attempt to open a victim’s airway, peace officers must consider whether or not the victim may have suffered any type of spinal injury.
If head, neck, or spinal cord injury is suspected, the victim’s head and neck may need to be protected by providing as much manual stabilization as possible.
|
|
|
Opening an airway - two methods |
head-tilt/chin-lift
jaw-thrust |
|
|
Head-Tilt/ Chin-Lift |
Provides maximum airway opening
1
• Move the jaw forward to a point where the lower teeth are almost touching the upper teeth
NOTE: Should not use the head-tilt/chin-lift maneuver if there are any indications of possible head, neck, or spinal cord injury.
|
|
|
Jaw-Thrust |
Use: • When head, neck, or spinal injury is suspected
1
|
|
|
Special considerations when attempting to open a victim’s airway |
Infants and Children
Facial Injuries
Dental Appliances |
|
|
Airway obstructions |
An airway obstruction can be either mild or severe. They are caused by a number of different materials blocking the person’s air passages.
Mild airway obstructionExamples include, but are not limited to the following. |
|
|
Mild airway obstruction |
If the victim indicates an airway problem (i.e., choking) but is able to speak or cough, the victim is experiencing a mild airway obstruction. With a mild airway obstruction, it may be assumed that there is adequate air exchange to prevent respiratory failure.
A victim who is conscious with a mild airway obstruction should be encouraged to cough forcefully to dislodge and expel the object.
Do not interfere with the victim’s attempts to cough (e.g., pound on the victim’s back). This could lodge the obstruction even further, causing a severe airway obstruction. If the obstruction cannot be removed by coughing and the victim has labored breathing, is making unusual breathing sounds, or is turning blue/grey, the victim should be treated as if there is a severe airway obstruction.
|
|
|
Severe airway obstruction |
The victim may be experiencing a severe airway obstruction if:
|
|
|
Tongue obstruction |
A large number of severe airway obstructions leading to respiratory failure are caused by the victim’s own tongue.
|
|
|
Removing airway obstruction - finger sweep |
If any object causing the obstruction can be seen it might be removed by using a finger sweep.
NOTE: The finger sweep maneuver should be done with care so that the object is not forced further into the victim’s throat.
|
|
|
Abdominal thrust |
The abdominal thrust (also referred to as the Heimlich maneuver) is one method used to force obstructions from a victim’s airway that cannot be removed with a finger sweep. Abdominal thrusts force air out of the lungs, expelling the obstruction, and clearing the victim’s airway.
Conscious Choking Adult or Child
Unconscious Adult or Child
NOTE: Abdominal thrusts should not be used on infants, pregnant women or obese patients. Instead use chest thrusts.
|
|
|
Chest thrusts |
The chest thrust is another maneuver that can be used to force obstructions from a victim’s airway. Chest thrusts are used in place of abdominal thrusts when the victim is:
Conscious Choking Adult |
|
|
Choking Infants |
A combination of back blows and chest compressions may be used to clear a foreign body from an infant’s airway.
Conscious Choking Infant
Conscious Infant becomes Unconscious
NOTE: Do not perform blind finger sweeps in infants and children because sweeps may push the foreign body back into the airway, causing further obstruction or injury.
|
|
|
Rescue breathing |
Rescue breathing is the process of using one’s own breaths to artificially breathe for a victim.
The rescue breathing process continues until the victim is able to breathe without assistance or other breathing support is provided by EMS personnel. |
|
|
Rescue breathing rates and duration |
• Give each breath in 1 second
Adult (Puberty and above) - Give 1 breath every 5-6 seconds (about 10 to 12 breaths per minute).
Children (newborn to puberty) - Give 1 breath every 3-5 seconds (about 12 to 20 breaths per minute).
|
|
|
Rescue breathing technique |
1 2 3
NOTE: If the victim begins to breathe without assistance, continue to assess the victim’s condition. Place in the recovery position, and provide care for shock |
|
|
Rescue breathing - conditions to be aware of |
If the victim’s mouth is injured and cannot be used for rescue breathing, the peace officer should use a mask-to-nose position.
|
|
|
Rescue breathing - breathing/ pulse checks |
The victim’s pulse and breathing should be checked approximately every two minutes.
|
|
|
Recovery position |
If the victim resumes adequate breathing and there are no indications of major bleeding or spinal injury, then the victim can be placed in the recovery position.
This position allows for drainage from the mouth and prevents the victim’s tongue from blocking the airway.
To place a victim in the recovery position: |
|
|
Gastric distention |
Rescue breathing can force some air into the victim’s stomach as well as lungs, causing the stomach to become distended. This condition is referred to as gastric distention.
|
|
|
Rescue breathing - Vomiting |
If a victim vomits, the vomit may enter the lungs and cause further life-threatening complications.
|
|
|
Circulatory system - 3 components |
The three components to the human circulatory system are the:
|
|
|
Bleeding control techniques - direct pressure |
• Direct pressure applied to the bleeding site until bleeding is controlled
NOTE: If clean dressing is not available, a gloved hand or other clean material may be used |
|
|
Bleeding control techniques - tourniquet |
Use of a device to close off all blood flow to and from a limb
|
|
|
Dressing |
A dressing is any material applied to a wound to control bleeding and prevent contamination |
|
|
Bandage |
A bandage is any material used to hold a dressing in place. |
|
|
Bleeding control techniques - methods |
Direct pressure and/or tourniquet should be used as the primary bleeding control technique;
however, peace officer/first responder’s may use elevation or pressure points. |
|
|
Open wounds |
An open wound is any injury where the skin has been broken, exposing the tissue underneath. |
|
|
Abrasion |
• A scraping away of only outer portion of the skin
For instance |
|
|
Incision |
• Smooth, straight cut
For instance |
|
|
Laceration |
• Jagged-edged wound
For instance |
|
|
Puncture |
• Deep wound through the skin and other tissue
For instance |
|
|
Avulsion |
• A part or structure of the body that has been forcibly torn or cut away
For instance |
|
|
Amputation |
• Surgical or traumatic removal of a body extremity
For instance |
|
|
Care for open wounds |
Care of open wounds will require an initial assessment and then action to stop bleeding and prevention of shock.
Assessment
Control Bleeding
Impaled Objects
NOTE: If initial bandaging does not stop the blood flow, add additional bandaging. (Do not remove initial bandaging)
Avulsions/ Amputations
Circulation
Continued care
|
|
|
Shock |
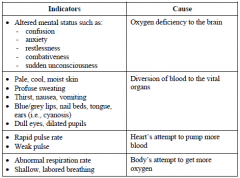
Shock is a life-threatening condition. If not immediately cared for, the victim can die. Perfusion is the continued flow of blood through the capillaries supplying the body’s tissues and organs with oxygen and removing waste products. Inadequate perfusion leads to shock.
There may be no relationship between severity of an injury and the onset of shock.
Victims may appear to have no major injury but still show signs of restlessness or anxiety, which are early stages of shock.
|
|
|
Shock - Indications |
|
|
|
Fainting |
Fainting is a form of shock characterized by sudden unconsciousness. It is caused by dilation of blood vessels resulting in reduced flow of oxygenated blood to the brain. |
|
|
Shock - Treatment |
All victims should be treated for shock even if no indications of shock are evident. When providing care to treat shock, peace officers/first responders should:
Even though the victim may be thirsty, do not give anything to drink. Shock can cause the gastrointestinal system to shut down. Fluids given orally may lead to vomiting |
|
|
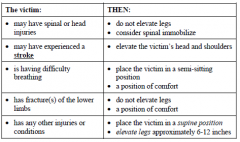
Shock - Positioning victim |
|
|
|
CPR - Review |
|
|
|
Head injury - Indications |
Head injuries can involve injuries to the skull, scalp, brain, blood vessels and fluid around the brain, and/or neck. They may vary from those involving minor bleeding to those leading to life-threatening conditions and spinal cord injury.
Indications of Possible Head Injury
Visible Injury
|
|
|
Head injury - First aid |
Whenever a victim has suffered a traumatic head or neck injury, brain and spinal cord damage should always be assumed.
Position
Treatment |
|
|
Head injury - Impaled objects |
Unlike treatment for other situations involving impaled objects, any object (e.g., knives, arrows, screw drivers, etc.) that is impaled into a victim’s cheek or face and causes an airway obstruction should be removed.
|
|
|
Nosebleeds |
Victims with facial injuries may experience an accompanying nosebleed.
If this occurs and no spinal injury is suspected, have the victim:
|
|
|
Chest and Abdominal Injuries - Blunt trauma |
Blow to the chest and/or abdomen causing: |
|
|
Chest and Abdominal Injuries - Penetrating Object |
Caused by bullets, knives, metal or glass, etc., can lead to: |
|
|
Chest and Abdominal Injuries - Compression |
Blunt trauma along with rapid chest and/or abdomen compression (e.g., striking a steering wheel) can lead to: |
|
|
Flail chest |
Flail chest is the condition where the ribs and/or sternum are fractured in such a way that a segment of the chest wall does not move with the rest of chest wall during respiration. It is caused when two or more ribs next to each other are broken. |
|
|
Closed chest wound - indicators |
Paradoxical breathing
Painful and shallow breathing |
|
|
Paradoxical breathing |
When both sides of the chest do not move in a synchronized manner |
|
|
Closed chest wound - first aid |
• Activate EMS system
|
|
|
Open chest wound |
All open wounds to the chest should be considered life-threatening.
With an open chest wound, air may enter the chest area causing a lung to collapse (e.g., sucking chest wound with a punctured lung). Under such conditions, the victim’s ability to breathe, and the victim’s heart function can be greatly impaired.
|
|
|
Occlusive dressing |
To prevent air from entering the chest cavity, an occlusive dressing should be applied to the wound as quickly as possible.
An occlusive dressing:
NOTE: As the victim inhales, the dressing is sucked tight to the skin, providing a seal over the wound. If the dressing is placed properly, respiration should partially stabilize. |
|
|
Applying an occlusive dressing |
1
NOTE: If the chest has both entrance and exit wounds, occlusive (airtight) dressings should be placed on both wounds. The physically higher wound should be vented. |
|
|
Closed abdominal wound - indicators |
• Victim found lying in a fetal position (with legs pulled up to chest)
|
|
|
Closed abdominal wound - first aid |
• Activate EMS system |
|
|
Open abdominal wounds - first aid |
An open abdominal wound can be caused by lacerations and punctures to the abdomen. Blood loss and the potential for infection should be of concern when dealing with an open wound to the abdomen.
Assessment
|
|
|
Open abdominal wounds - Protruding organs |
If any organs or portion of an organ protrude from the abdominal wound, do not attempt to touch, move, or replace them. Cover the organ and the rest of the wound with a moist dressing and seal with an occlusive dressing
|
|
|
Open abdominal wounds - Protruding organs - first aid |
Assessment
Treatment |
|
|
Musculo-skeletal system |
The musculoskeletal system is the system of bones, muscles, and other tissue that support and protect the body and permit movement.
The components of the musculoskeletal system include bones, joints, skeletal muscles, cartilage, tendons, and ligaments. |
|
|
Bone |
• Hard yet flexible tissue |
|
|
Joint |
• Place where bones fit together |
|
|
Skeletal Muscle |
• Soft fibrous tissue |
|
|
Cartilage |
• Connective tissue that covers the outside of the ends of bones |
|
|
Tendon |
Bands of connective tissue that bind muscles to bones |
|
|
Ligament |
• Connective tissue that attaches to the ends of bones and supports joints |
|
|
Musculo-skeletal injuries - 3 types of force |
Direct
|
|
|
Musculo-skeletal injuries - common 4 injuries |
The four most common injuries are fractures, dislocations, sprains, and strains |
|
|
Fractures |
• Complete or partial break of a bone
Indicators: • Limb deformity (differences in size or shape) |
|
|
Dislocations |
• When a bone is pushed or pulled out of alignment from a joint
Indicators: • Constant pain |
|
|
Sprains |
• Severely stretched or torn ligaments
Indicators: • Pain |
|
|
Strains |
• Over-stretching or tearing of muscle
Indicators: • Pain |
|
|
Musculo-skeletal injuries - first aid |
Assessment
|
|
|
Burn |
A burn is an injury caused by heat, chemicals, or electricity. Burns can involve just the outer-most layer of the skin or go deeper into structures below the skin including muscle, bone, nerves, and blood vessels. Along with physical damage, victims with burns can also experience great pain and emotional trauma from the injury. |
|
|
Burn - victim assessment |
Prior to any first aid measures, no matter how extreme the burn, a victim assessment including primary and secondary surveys should be conducted.
|
|
|
Burn - Classification |
Burns involving the skin are classified according to the depth of the burn in the tissue. Classifications include first-degree burns, second-degree burns, and third-degree burns |
|
|
Burn - first-degree |
Depth of Injury
Additional Information • Skin appears red |
|
|
Burn - second-degree |
Depth of Injury
Additional Information • Skin appears red and mottled (spotted) |
|
|
Burn - third-degree |
Depth of Injury • Damage to the epidermis, dermis, and into fatty layer and muscle beneath the skin
Additional Information • Most serious of all burns
|
|
|
Burn - common types |
The most common types of burns are thermal burns, chemical burns, and electrical burns. |
|
|
Burn - first aid - thermal |
Thermal Burns
NOTE: Over cooling 3rd degree burns may lead to hypothermia. |
|
|
Burn - first aid - chemical |
Chemical Burns
NOTE: Bandage should hold dressing in place and protect the area from contaminants. Bandaging too tightly may not only cause pain but also restrict swelling. |
|
|
Burn - first aid - electrical |
Electrical Burns
NOTE: Entrance and exit wounds caused by electrical current may be difficult to see initially. They will be found in different locations on the victim’s body. For example, if the victim touches a live wire, current may enter the body through the hand, pass through the body, and exit through the victim’s feet. |
|
|
Burn - first aid - radiation |
Radiation Burns
NOTE: If symptoms occur during or after medical radiation treatments, notify physician or seek medical treatment. Handle affected areas gently. Treat symptoms or illnesses as advised by physician. |
|
|
Electrical current and vehicles |
If peace officers respond to calls where live power lines have fallen onto a vehicle, they should:
|
|
|
Radiation sickness |
Radiation sickness is illness and symptoms resulting from excessive exposure to radiation, whether that exposure is accidental or intentional (as in radiation therapy).
Radiation sickness results when humans are exposed to excessive doses of ionizing radiation. Radiation exposure can occur as a single large exposure (acute), or a series of small exposures spread over time (chronic).
Radiation sickness is generally associated with acute exposure and has a characteristic set of symptoms that appear in an orderly fashion. Chronic exposure is usually associated with delayed medical problems such as cancer and premature aging, which may happen over a long period of time.
|
|
|
Radiation sickness - signs and symptoms |
The signs and symptoms of radiation sickness may include: • Fainting |
|
|
Radiation sickness - acute exposure |
In most cases, a large single dose of radiation can cause both immediate and delayed effects. Acute exposure, if large enough, can cause rapid development of radiation sickness that may include bone marrow damage, gastrointestinal disorders, bacterial infections, hemorrhaging, anemia and loss of body fluids.
Delayed effects can include cataracts, temporary infertility and cancer. Extremely high levels of acute radiation exposure can result in death with in a few hours, days or weeks depending on the dose. |
|
|
Radiation sickness - chronic exposure |
Chronic radiation exposure often produces effects that can be observed within weeks after the initial exposure. However, signs and symptoms of chronic radiation exposure may not show up until years later, or they may not develop at all.
|
|
|
Radiation sickness - first aid |
ONLY PROVIDE MEDICAL CARE IF YOU HAVE APPROPRIATE PROTECTIVE GEAR TO PREVENT POSSIBLE CONTAMINATION. |
|
|
Cardiac emergencies |
A cardiac emergency can range from a victim experiencing shortness of breath or palpitations to full cardiac arrest. Swift action is necessary on the part of peace officers to prevent death or permanent neurological injury. |
|
|
Heart attack |
Heart attack is a common term describing minor to severe conditions. Minor conditions include blockage of blood or lack of oxygen to heart tissue, with varying levels of pain. If the victim does not receive appropriate care immediately, the victim’s chances of survival are greatly reduced. |
|
|
Coronary artery disease (CAD) |
Coronary artery disease (CAD) (often referred to as coronary heart disease) is a disease where fatty deposits build up in the walls of the arteries that feed the heart’s muscle. If an artery becomes blocked, the heart muscle will be deprived of blood and oxygen. |
|
|
Cardiac emergencies - other causes |
Cardiac arrest may also be caused by: |
|
|
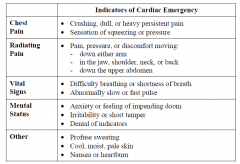
Cardiac emergencies - indicators |
|
|
|
Cardiac emergencies - first aid |
Although the indicators of a cardiac emergency resemble the indicators of a number of other medical conditions (e.g., heartburn), peace officers should always first assume that a cardiac emergency exists, activate the EMS system (if not already activated), and take appropriate first aid measures.
Assessment
|
|
|
Cardiac emergencies - medications |
Some victims with existing cardiac conditions may be taking prescription medications for that condition. Unless authorized and trained, peace officers should never administer any medications, prescribed or otherwise.
|
|
|
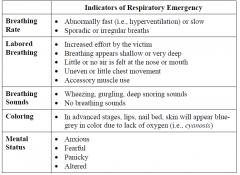
Respiratory emergencies |
Respiratory emergencies may range from victims who are having breathing difficulty, but nevertheless are breathing adequately, to victims who are not able to breathe at a level that will sustain life. |
|
|
Normal breathing rate |
Adult (puberty and older)
|
|
|
Causes of inadequate breathing |
There are numerous possible causes that could lead to inadequate breathing and potential respiratory arrest (when breathing stops completely), including: |
|
|
Respiratory emergencies - indicators |
|
|
|
Respiratory emergencies - first aid |
Assessment
• Activate EMS system |
|
|
Seizure |
A seizure is the result of a surge of energy through the brain.
Instead of discharging electrical energy in a controlled manner, the brain cells continue firing, causing massive involuntary contractions of muscles and possible unconsciousness.
If only part of the brain is affected, it may cloud awareness, block normal communication, and produce a variety of undirected, unorganized movements |
|
|
Seizure - indicators |
Indicators of a seizure may include: |
|
|
Seizure - first aid |
Activate EMS
Treatment
Post seizure assessment
After the seizure has ended, individuals may experience a period of post-seizure confusion.
Peace officers should remain with the individual until the individual is reoriented to the surroundings and victim is transferred to equal or higher level of care.
Look for medical alert identification, place victim in the recovery position and care for any injuries that occurred during the seizure.
|
|
|
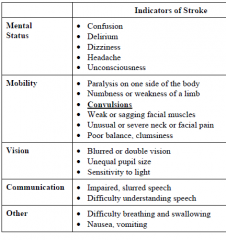
Stroke |
A victim experiences a stroke (i.e., cerebrovascular accident (CVA)) when an artery providing blood to the brain is blocked. A stroke can also be caused by a ruptured blood vessel in the brain creating pressure on brain tissues. |
|
|
Stroke - indicators |
|
|
|
Stroke - first aid |
Assessment
Treatment |
|
|
Diabetic emergencies |
The basic source of energy within the human cell is glucose. Glucose is circulated throughout the body in the bloodstream. In order for glucose to pass from the bloodstream into the body’s cells, insulin, a hormone produced by the pancreas, must be present. An imbalance of insulin in the body and glucose in the bloodstream can lead to life-threatening conditions.
|
|
|
Glucose |
basic source of energy within the human cell |
|
|
Insulin |
hormone produced by the pancreas, |
|
|
Diabetes |
Diabetes is a condition brought on when the body does not produce a sufficient amount of insulin. Diabetes can occur at any age. |
|
|
Diabetic emergencies - 2 dangerous conditions |
An improper level of insulin in the body can lead to two potentially dangerous conditions: insulin shock (hypoglycemia) and diabetic coma (hyperglycemia). |
|
|
Hypoglycemia |
Insulin shock
Onset: • Can come on suddenly Skin: • Pale, cold, moist, clammy Breathing: • Otherwise normal breathing Mental status: • Hostile or aggressive behavior Pulse: • Rapid pulse Other: • Dizziness, headache |
|
|
Hyperglycemia |
Diabetic coma
Onset: • Usually slow onset Skin: • Red, warm, dry Breathing: • Labored breathing Mental status: • Decreased level of consciousness Pulse: • Weak, rapid pulse Other: • Dry mouth, intense thirst
|
|
|
Diabetic emergency vs. other conditions |
There are a number of indicators of a diabetic emergency that are similar to indications of alcohol intoxication or substance abuse. |
|
|
Diabetic emergencies - first aid |
Because it can be extremely dangerous and life-threatening if left untreated, a possible diabetic emergency must be thoroughly assessed and first aid measures taken immediately.
Assessment
Treatment
NOTE: Types of oral glucose include: |
|
|
Poison |
A poison is any substance introduced to the body that causes damage. |
|
|
Poison identification |
Children are the most common victims of poisoning. Adults may become victims of poisons from their environment as well as by overdoses of medications or substance abuse
Peace officers should attempt to determine: |
|
|
Poison - Peace officer safety |
Peace officers responding to medical emergencies involving poisons should take appropriate precautions against exposing themselves to the substance as well. |
|
|
Poison - Manner of exposure |
Ingestion Examples:
Examples:
Absorption Examples:
Injection Examples: |
|
|
Poison - indicators |
Ingestion
Absorption
NOTE: Some individuals may have a systemic (i.e., whole body) reaction when exposed to certain substances. One symptom of a systemic reaction is anaphylactic shock, a condition that causes the airway to swell, making breathing difficult if not impossible.
|
|
|
Poison - first aid |
Activate EMS
Assessment
|
|
|
Alcohol / substance abuse |
There are a number of indicators specific to poisonings caused by alcohol and/or substance abuse, of which peace officers should be aware.
Indications of withdrawal from alcohol or drugs can include, but are not limited to:
|
|
|
Hypothermia |
Hypothermia occurs when the body’s internal temperature drops to the point where body systems are affected.
Hypothermia can range from mild to severe due to a number of factors:
|
|
|
Hypothermia - indicators |
Mild-Moderate Hypothermia
|
|
|
Hypothermia - First aid |
Mild-Moderate Hypothermia
|
|
|
Frostbite |
Exposure to cold temperatures can also lead to cold-related injuries to parts of the body. Injuries that are the result of cold or freezing tissue include frostnip and frostbite.
|
|
|
Frostnip - first aid |
Frostnip
Indicators
First Aid |
|
|
Frostbite - first aid |
Indicators: • Freezing of tissue below the skin’s surface
First aid
NOTE: Do not rub the affected area. Damage may be caused by ice crystals that have formed below the surface of the skin.
|
|
|
Heat cramps |
If the body is unable to get rid of excess heat, the body’s internal temperature can rise to a level that can cause pain, organ damage, or even death.
Heat cramps can strike when the body loses too much salt due to prolonged perspiration.
The person will have a normal body temperature and be able to think clearly.
Indicators: • Painful muscle spasms usually in the legs or abdomen |
|
|
Heat exhaustion |
Heat exhaustion is a condition that is more serious than heat cramps. It is a form of shock that can occur when the body becomes dehydrated. Once a person who is exposed to heat becomes thirsty, that person may already be suffering from dehydration.
Indicators: • Profuse sweating
|
|
|
Heat cramps / exhaustion - first aid |
• Remove victim from source of heat |
|
|
Heat stroke |
heat exhaustion is not recognized and treated promptly, heat stroke may set in. Heat stroke occurs when the body’s internal temperature rises abnormally high. Heat stroke is a life-threatening condition requiring immediate attention
Indicators: • Red, hot, dry skin |
|
|
Heat stroke - first aid |
• Activate the EMS system (if not already done)
NOTE: Heat stroke can affect children or the elderly who have circulatory problems, even when they are not exposed to extreme heat.
|
|
|
Stings and Bites |
Insect stings, spider bites, and snake bites can all be sources of injected toxins. Certain insects, spiders, and snakes can inject toxins that cause serious consequences if not treated rapidly. |
|
|
Anaphylaxis (i.e., anaphylactic shock) |
Anaphylaxis (i.e., anaphylactic shock) is a severe, life-threatening allergic reaction caused by exposure to certain allergens.
Exposure to an allergen
Epinephrine is a hormone produced by the body. When administered as a medication soon after exposure, epinephrine will constrict blood vessels and dilate the bronchioles helping to open the victim’s airway.
|
|
|
Epinephrine |
Epinephrine is a hormone produced by the body. When administered as a medication soon after exposure, epinephrine will constrict blood vessels and dilate the bronchioles helping to open the victim’s airway. |
|
|
Insect stings and bites - usual reaction and first aid |
Usual reaction • Local swelling
First aid |
|
|
Insect stings and bites - allergic reaction and first aid |
Allergic reaction • Itching • Burning sensation
First aid |
|
|
Marine life stings - indicators and first aid |
Poisoning from marine life is generally caused by the stings or puncture wounds of poisonous organisms (e.g., jellyfish, sea nettle, sea anemone, coral, Portuguese Man-O-War, stingray, sea urchin, etc.).
• Pain
First aid |
|
|
Spider bites - black widow |
Black Widow
|
|
|
Spider bites - brown recluse |
Brown Recluse
|
|
|
Spider bites - first aid |
• Wash site with soap and water |
|
|
Snake bites - indicators and first aid |
Indicators
First aid |
|
|
Animal and human bites - indicators and first aid |
Indicators
First aid
NOTE: If possible, an attempt should be made to identify the circumstances that led to the bite and locate the animal for rabies testing |
|
|
Childbirth - Who can deliver a baby |
Only the woman herself can deliver her infant |
|
|
Childbirth - First responder role |
If called upon to assist during normal childbirth, it is the peace officer’s role to activate the EMS system, determine if the woman can be transported prior to the birth, and provide support as the woman delivers the infant. |
|
|
Childbirth - First responder actions |
The First Responder should build a rapport by introducing themselves to the mother. First responders should: |
|
|
Childbirth - transport |
One of the first decisions the assisting peace officer will need to make is whether or not to arrange for transport to a medical facility prior to delivery of the infant. The woman can be safely transported only if she is in the first stage of labor (not straining, contractions are greater than 5 minutes apart, no signs of crowning).
|
|
|
Childbirth - Imminent birth |
If any of the following conditions exist, the mother is entering the second stage of labor and birth may be imminent. The woman should not be transported.
|
|
|
Childbirth - complications - excessive bleeding |
Indicators
First Aid |
|
|
Childbirth - complications - transportation considerations |
Should any of the following conditions exist, immediately transport mother to nearest medical facility: |
|
|
Childbirth - newborn fails to breathe |
A newborn should begin breathing on its own within 30 seconds after birth. If it fails to breathe, rubbing the infant’s back or tapping the infant’s feet may stimulate spontaneous respiration.
|