![]()
![]()
![]()
Use LEFT and RIGHT arrow keys to navigate between flashcards;
Use UP and DOWN arrow keys to flip the card;
H to show hint;
A reads text to speech;
20 Cards in this Set
- Front
- Back
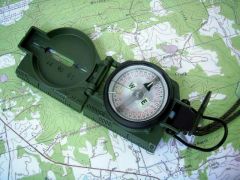
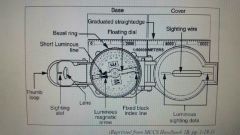
Name the Parts of the Lensatic Comp. |
|
|
|
Functions of Thumb Loop |
•Serves as retaining devise to secure compass in closed position •Used when holding compass in position for sighting on objects |
|
|
Cover |
• contains sighting wire • closed, protects the face of the crystal • when at 90° degree angle to other half, can be used to sight on objects |
|
|
Sighting Wire |
• provides exact azimuth for objects • used for compass calibration • used with steering marks |
|
|
Bezel Ring |
• holds upper glass crystal in place • helps preset a direction for night compass navigation • contains 120 clicks when rotated fully, each click equals 3 degrees |
|
|
Black Index Line |
• stationary line used as a reference line for determining direction • when held properly, identifies direction compass is pointing |
|
|
Compass Dial |
• floats free when in use • locked in place by closing the eyepiece • contains two complete circular scales, one in degrees (red) and one in mils (black) |
|
|
Lanyard |
Helps prevent loss of the compass |
|
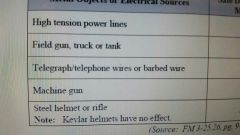
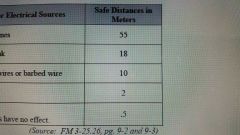
Objects Causing Limitations |
|
|
|
Two basic techniques using a lensatic compass |
•center hold technique •compass to cheek technique |
|
|
Advantages of Center Hold Technique |
• Fast and Easy • used under any visibility conditions without taking off helmet or removing rifle from sling arms • easier to maneuver |
|
|
Advantages of Compass to Cheek Technique |
• more accurate than center hold • ideal when employing intersection and resection techniques and a more acurate azimuth is required |
|
|
Contour Lines |
Imaginary lines on the ground that show elevation. All points on a contour line are the same elevation |
|
|
3 types of Contour Lines |
• index- numbered to show elevation of that index line • intermediate- thinner contour lines falling between index lines • supplementary- dashed contour lines, showing sudden changes in elevation |
|
|
Marginal Information |
Map instructions placed around the outer edge of the map |
|
|
Basic Map Reading Rule |
Read Right then Up |
|
|
Use of Sterring Marks |
Plot a course, shoot an azimuth and use well defined guiding objects. Example: building |
|
|
Dead Reckoning |
Navigating using only pace counts and azimuths Employed when Terrain Association can not be used |
|
|
Shifting Techniques |
Used when terrain association is largley impossible. |
|
|
Bypassing Large Obstacles |
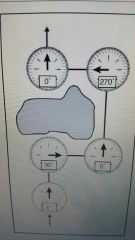
|